Home
About me
Previous Design Posts
Awards
My Jewellery
Contact
Privacy Policy
Terms & Conditions
Showing posts with label
Happy Cuts machine
.
Show all posts
Showing posts with label
Happy Cuts machine
.
Show all posts
Tuesday, 4 December 2012
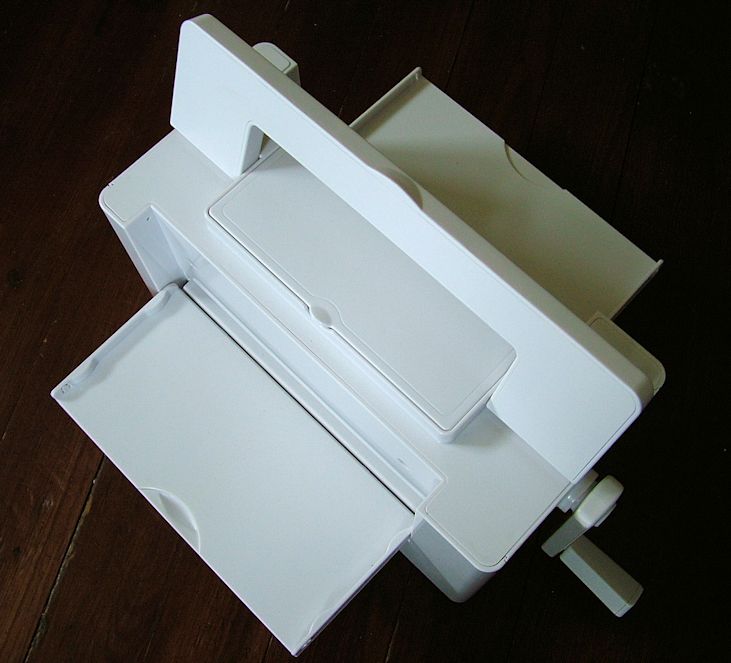
Happy Cuts A4 Cutting & Embossing Machine
Hi everyone, today I thought I would show you my new
'Happy Cuts'
machine by Artemio. Not much info about it
on the web, so I will try and give you as much info here as I
can. Not used it much as yet as it's an Xmas pressie really,
but I had a few 'experiments' with it just for you :) I must first
say I am very pleased with it , it cuts and embosses beautifully.
There are so many plates to use it's easy to get the right
sandwich for whatever you wish to cut or emboss.I bought my
machine from
Samuel Taylors
btw.,( no connection), arrived
quickly & good service . I also bought the clear SP plate
there too.I believe you can also buy two clear plates now so
you can see what you are cutting or embossing but I manage
ok with just the embossing SP clear plate.The Happy Cuts machine
is made in the same factory as the older Joy Trouvaille machine.
They are virtually the same machine, except the Happy Cuts
has metal gears and not plastic (I decided it may be a lot sturdier
too). Mine is white and the JT is a cream/off white colour too.
Weight wise it's (7.5 kg) it feels just about the same
weight as my old Cuttlebug machine.I like the fact that it folds
flat on top so you can store all your plates on top too.The sides
fold up and the top handle lies flat, there is a little top compartment
for keeping small dies in also. It will cut Spellbinders dies, Memory
Box,Marianne,Magnolia ,Cuttlebug ,Nellies,Cheery Lynn, Quickutz,Jeart,Joycraft
Cart Us,X Cut,Papermania,some Sizzix dies ( thicker dies need the blue plate or SP
plate and not the Grey plate.)You CAN'T use the Sizzix thick dies,
or the Big shot dies( big black ones),or the BigZ dies, or Marriane
Designs cut & emboss folders.It will take the Cuttlebug thick
metal/foam alphabet and other similar dies though.
These are the plate 'sandwiches' I use.
To cut (plates from bottom upwards)
White A plate
Die
Card
Grey C plate
( does Spellbinders)
To Emboss (plates from bottom upwards)
White A plate
Black rubber mat
Die in card ( facing up)
Black B plate
( does Spellbinders)
To cut & then emboss
White A plate
Die
Card
Grey C plate
( then remove C plate and add Black B plate)
To emboss with a folder(plates from bottom upwards)
( Cuttlebug type, others may vary)
Black B plate
Card in folder
SP clear plate
To die cut other dies ( Cuttlebug alphabet etc)
White A plate
Die
Card
SP plate
Sizzix (old black backed dies)
Black plate
SP clear plate
To use the new M-boss folders( double sided)
(Takes 350gsm card)
Black B plate
Card in folder
SP clear plate
or use
White A plate
Card in folder
One or Two cuttlebug B plates (side by side if needed)
It cuts paper, card,glitter card fabric,vellum,foil,grungboard,parchment,
acetate and ( felt up to 2mm).
Hope that list helps some of you, I found the info on various sites,
thankyou to the blog owners ( sorry can't remember who now). Some
of the info is what I have found to be right by using the machine myself.
I will add more info here as I find it also.The main thing is not to force
the plates through the machine, if it won't go through use a thinner plate.
Also the handle can spin backwards if the 'sandwich' is too tight, so be
aware of that too ( Ouch....just did that).
Update.......to use the newer A4 embossing folders( Crafts Too
and Grand M-Bossabilities etc.)
from bottom up
White A plate
Card in folder
2 old Cuttlebug B plates side by side
These all come with the machine, top one is a rubber mat.
This is an extra to buy !
Older Posts
Home
Subscribe to:
Posts (Atom)
Pinterest button
LinkWithin